Navigate to Data Administration -> Assets to enter or modify asset records, including associated tasks, parts and authorized users. An asset can be anything within your business that requires testing, replacement or service at regular intervals based on either elapsed time or actual usage. Assets might be vehicles, machinery, individual components, fixtures and facilities. If you are using FaciliWorks 8i Calibration, this module is also used for entering gage records. For information about entering gage records, see the Gage Entry tabs later in this chapter.
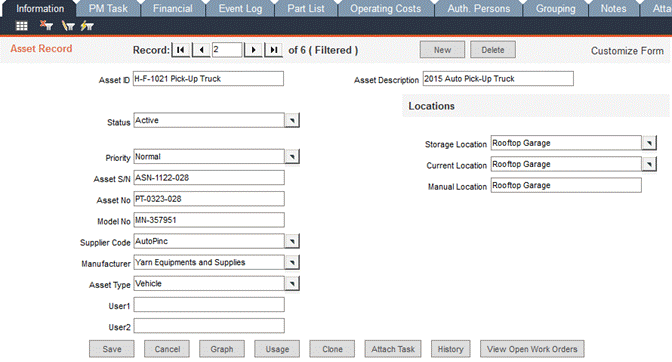
Navigate to the Data Administration -> Assets -> Information tab.
To add a new asset record, click the New button.
Asset ID: Enter a unique alphanumeric identification code for each asset record. This ID must be unique in order to store the record in your database. This field cannot contain special characters such as #, *, ?, !, ‘, or [ ] . If Automatic Numbering for Asset ID and Numbering Schemes is enabled and an Asset ID Numbering format is defined within the Configuration -> Admin Settings -> Automatic Numbering tab, clicking the New button will automatically populate the Asset ID field with the next sequential number. Please see the FaciliWorks Administrator Guide for information about numbering formats.
Asset Description: Enter a brief, informative description of the asset (if you use similar words for similar assets, you can later filter by this field).
Status: Use the pop-up list to assign a status to the asset. If a status is not specified, the asset will be marked as Active when the record is saved. If the Status is not Active, FaciliWorks will not schedule the next maintenance due and the Maintenance Due reports will skip over this asset, as they show only active assets.
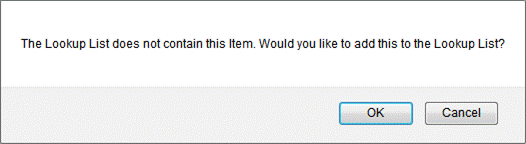
Priority: Enter the asset’s priority rating or select a rating from the pop-up list to indicate how important the asset is to your operations. If you type a value in this field that is not already in the pop-up list, FaciliWorks will prompt you to add it to the pop-up list so you can select it for future assets:
Asset S/N: Enter the asset’s serial number.
Asset No: Enter the asset number (usually issued by your accounting department).
Model No: Enter the asset’s model number.
Supplier Code: Select the ID code or name of the asset supplier from the pop-up list.
Manufacturer: Enter the name of the asset manufacturer or select it from the pop-up list. If you type a value in this field that is not already in the pop-up list, FaciliWorks will prompt you to add it to the pop-up list so you can select it for future assets.
Asset Type: Enter the type of asset or select it from the pop-up list. If you type a value in this field that is not already in the pop-up list, FaciliWorks will prompt you to add it to the pop-up list so you can select it for future assets. This field can be useful when creating reports or searching for certain asset types.
You can enable Automatic Numbering for Asset ID and Numbering Schemes
and define a Numbering Scheme format for specific Asset Types.
These settings are defined within the Configuration -> Admin Settings
-> Automatic Numbering tab. For detailed information, please consult
the FaciliWorks Administrator Guide.
With these settings defined, navigate back to the Assets -> Information tab. Click New to create a new record. If you have defined an Asset ID Numbering format, the Asset ID field will be populated with the next number in the sequence. However, after selecting an Asset Type and clicking Save, a message similar to the following will appear:

Click OK and FaciliWorks will automatically populate the Asset ID field with the next sequential number in the Asset Type Numbering Scheme. Please see the FaciliWorks Administrator Guide for information about numbering formats.
User 1 and User 2: Use these two fields to store additional information about the asset. Use the Customize Form button at the top right of the screen to re-label these fields. If you need more than two user defined asset fields, see the User Defined tab.
Storage Location: Enter the asset’s storage location or select a location from the pop-up list. If you type a value in this field that is not already in the pop-up list, FaciliWorks will prompt you to add it to the pop-up list so you can select it for future assets.
Current Location: Enter the actual location of the asset. FaciliWorks will automatically update this field based on the asset’s issue and return information. If the asset is issued out to an employee, the Staff ID will appear in the Current Location field. To issue out the asset, use the Usage button.
Manual Location: Enter the physical location of the service manual or asset manual.
To view or print an asset downtime graph, click the Graph button.
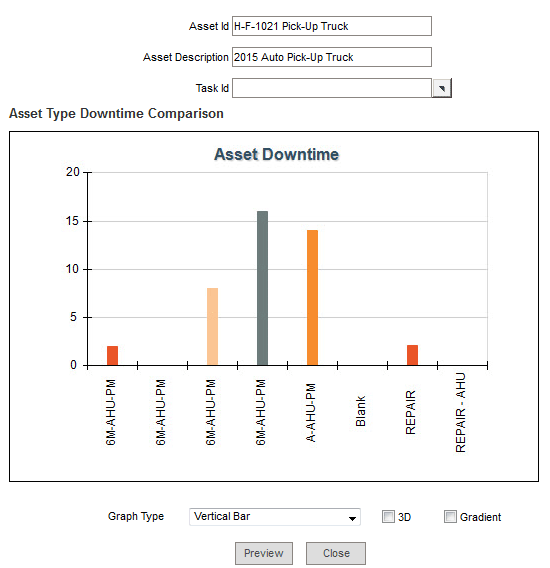
By default, FaciliWorks will graph the entire downtime history for all tasks performed on the asset. To limit the graph to a specific task, select the task from the Task ID pop-up list at the top of the graph.
Use the Graph Type drop-down list to select the type of graph you’d prefer to see. Click the 3D and Gradient checkboxes to change the appearance of the graph.
To preview the graph before you print, click Preview. From the preview screen the graph can be printed.
To display a specific date range for asset downtime, see the Graphs chapter.
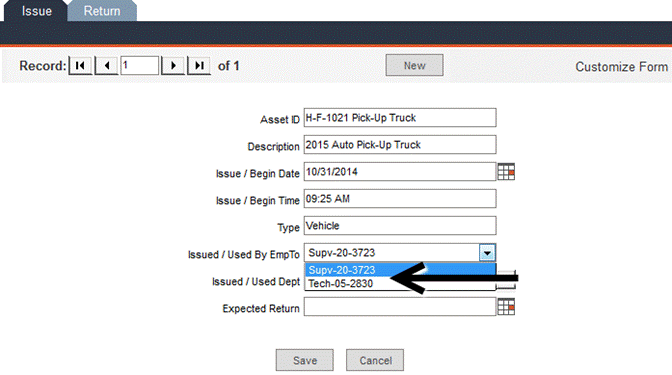
Click the Usage button on an asset record to issue or return the asset; the Issue tab is displayed. Click the New button to create a new issuance record. Each issuance will have both an Issue and Return tab associated with the record.
The following fields will be automatically populated with information from the asset record: Asset ID, Asset Description and Type.
The Issue/Begin Date and Issue/Begin Time fields will be automatically populated with the current system date and time.
Use the Issued/Used By EmpTo pop-up list to select the employee to whom the asset is being issued. If this asset is restricted to specified authorized users, only those users will be available in this list.
Use the Issued/Used Dept pop-up list to select the employee’s department.
Enter an Expected Return date.
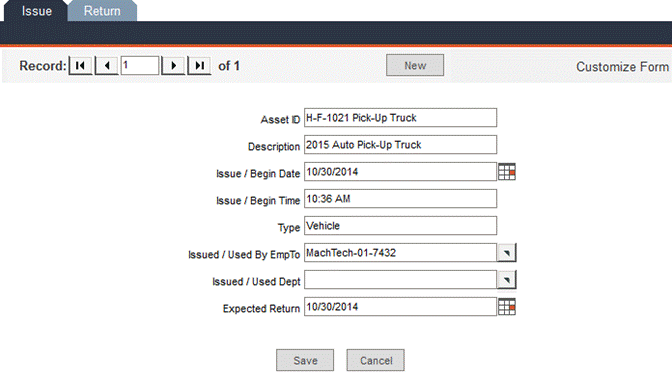
Click Save to save the issuance record and close the Issue/Return window. The Current Location field in the asset record will now show the Staff ID of the employee to whom the asset was issued:
When the employee returns the asset, click the Usage button, then select the Return tab.
The Asset ID and Asset Description fields will be automatically populated.
Received/End Date and Received/End Time can be manually entered or can be set to the current system date and time by clicking the blank rectangular button to the right of the calendar icon.
Use the Received/End From pop-up list to select the name of the employee who returned the asset (this is not necessarily the same person to whom it was issued).
If you track Meter Time for this asset, enter the amount used.
Enter any applicable Notes regarding the issuance or return of this asset.
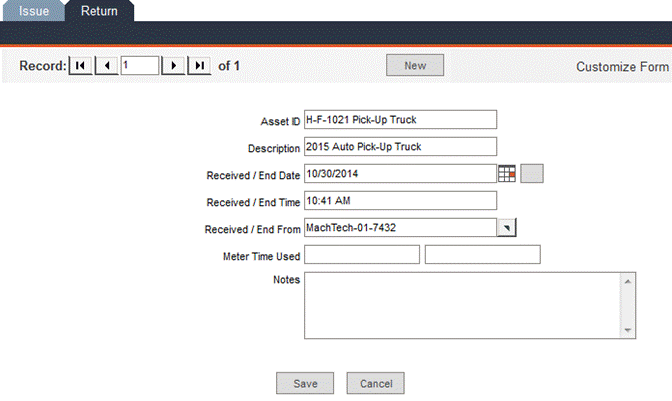
Click the Save button; the Issue/Return window will close and the asset record will now show that the asset is back in its storage location.
Notice in this issue/return example that the record indicator bar (on both the Issue tab and the Return tab) shows that this is record 1 of 1. If we create another issuance record for this asset, that issuance will be record 2 of 2. Clicking the Return tab for that second issuance automatically displays a new return record (record 2 of 2) corresponding to the most recent issuance.
To create a new asset record that is a copy of an existing record, including its set of PM tasks, labor, contractors, checklists, variables, procedures, and parts, click the Clone button.
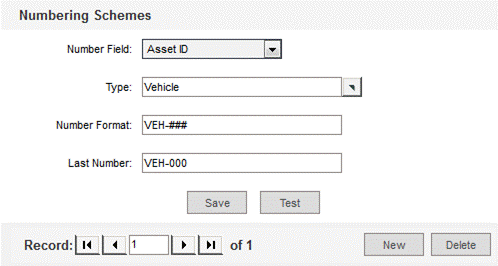
If the Asset Type of the source asset has a Numbering Scheme, then FaciliWorks will suggest the next number in the Numbering Scheme sequence by auto-filling the New Asset ID field.
The Numbering Scheme is defined within the Configuration -> Admin Settings -> Automatic Numbering tab (pictured below). In this example, all assets that are vehicles will be given Asset IDs that follow the defined vehicle numbering scheme:
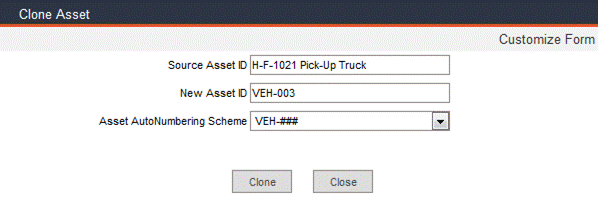
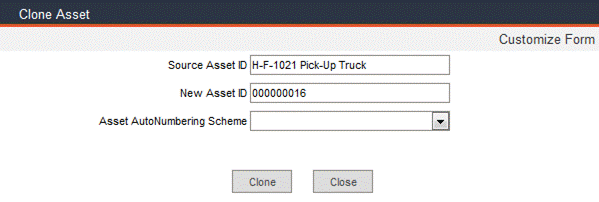
When a vehicle asset record is cloned, the Clone Asset window will display the Source Asset ID, the New Asset ID and the Asset Auto Numbering Scheme:
Click the Clone button to create the clone; the asset has been cloned successfully:
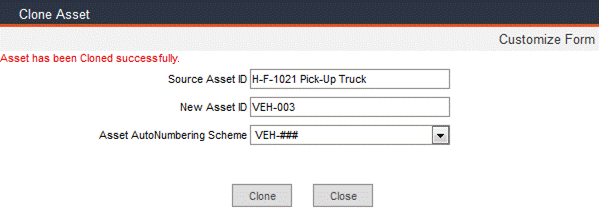
Click Close to close the Clone Asset window.
To create a new asset record that is a replica of an existing record, click the Clone button.
If the Asset Type of the source asset does not have a Numbering Scheme, then application will suggest the next number in the Asset ID Numbering Format sequence. If no Numbering Scheme has been defined, the New Asset ID must be entered manually.
If the New Asset ID field is blank, enter a value manually. Do not change the Source Asset ID. Once you've typed the New Asset ID, click Clone to clone the asset; the window will display a message the asset has been cloned successfully.
To clone the same asset record again, enter another New Asset ID and click Clone. Click Close when you’re finished.
The Attach Task button allows you to attach a single task to all assets of the same type. The Asset Type of the current asset record will be the Asset Type shown in the Attach Task to Multiple Asset window. This field can be changed by making a selection from the Asset Type pop-up list.
Select a Task ID from the pop-up list.
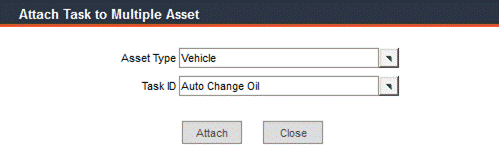
Click the Attach button to assign this task to every asset record of this Asset Type. The following window will appear:
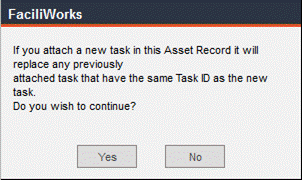
Clicking No will cancel the action. Clicking Yes will complete the action and display the following confirmation message:
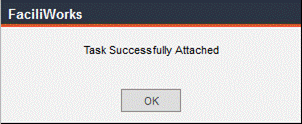
Click OK; the Attach Task to Multiple Asset window will close.
Within an asset record, click the View Open Work Orders button to go directly to the detailed view the asset’s open work orders. To return to the asset record, click the Asset Entry button at the bottom of the work order screen.
Click the History button to view a summary of the work order and preventative maintenance history for the current asset. The summary includes the date completed, work order or PM number, task performed, technician and total cost.

This window is designed for viewing purposes only; you cannot edit or print from this window. To view the complete work order or preventative maintenance order, click the green square button to the left of the record you would like to view. The complete record will open in another window. When finished, close this window and the Asset History window to return to the asset record.
All tasks that are associated to the current asset are assigned on this form. Navigate to the Assets -> PM Task tab. At the top of the form are Asset ID and Asset Description for the current asset. These fields contain the data previously entered in the Information tab. It is read-only on this screen, but can be edited by going back to the Information tab.
In the Assets -> PM Task -> Task sub-tab, select a Task ID from the pop-up list or enter a new task to assign to your asset. If you select a task that was previously entered via Data Administration -> Tasks, all of the task information entered there will automatically populate this form. You can edit the information in this screen to suit the associated asset. If you change the task in this screen, FaciliWorks considers these changes specific to the current asset record. Your changes will not appear in any other records linked to this task, nor will it change the original task entry data. Any new task that you create within the asset record belongs solely to that asset. This means that the task cannot be used for any other asset records. It is highly recommended that you create all tasks that will be available for your asset records in Data Administration -> Tasks, and then return to your asset record and link it to the asset by selecting it from the Task ID drop-down list.
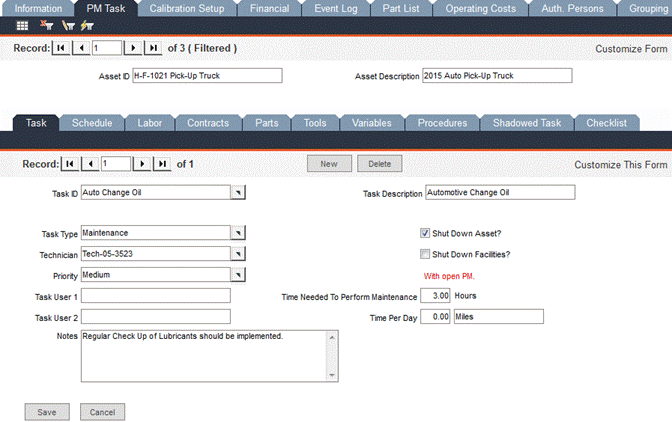
When a Task ID is selected from the pop-up list, the Task Description, Task Type, Technician and Priority fields are automatically populated with the task data entered from within Data Administration -> Tasks.
Task User 1 and Task User 2: Use these two fields to store additional information about the task.
Notes: Use this field to store additional information about this task.
Shut Down Asset? Check this box to indicate that the task requires the asset to be shut down.
Shut Down Facilities? Check this box to indicate that the task requires the facility to be shut down.
With Open PM: This red text will be displayed if the asset task currently has an open preventative maintenance order. The text appears automatically by FaciliWorks when a new PM order is pending. If you notice that FaciliWorks has not notified you that a new preventative maintenance is due for the asset, it is most likely because there is currently an open preventative maintenance order. You must complete the current PM order before FaciliWorks notifies you that a new PM is due.
Time Needed to Perform Maintenance ___ Hours: Estimate the number of hours it will take the technician to perform this task.
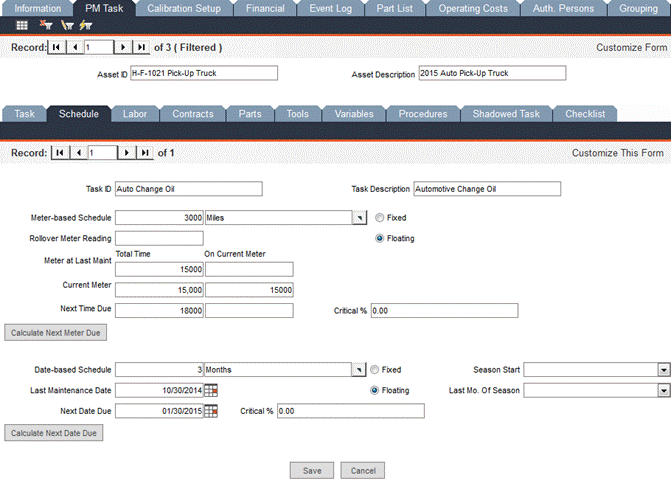
Time Per Day: This feature directly relates to the Calendar feature found on the dashboard. Use this field to calculate when maintenance will be due based upon the meter reading. For example, Asset 01 has Task 01 that has a Meter-based Schedule of 100 hours. The Current Meter Reading is 50 hours and the Time Per Day is 10 hours. The person opens the maintenance calendar on 02/11/2015. Task 01 will show up on the calendar on 02/15/2015. Task 01 will next show up on the calendar on 02/25/2015 (100 hours/10 hours per day = 10 days; 02/15/2015+ 10 days = 02/25/2015). This feature requires that the Use Both Meter-based and Date-based Schedules checkbox is checked in the Configuration -> Admin Settings -> Calendar tab. When this checkbox is checked, the calendar will show date-based and meter-based schedules and if an asset has both schedules, it will check which schedule happens first. If the meter schedule happens first, then the meter schedule is plotted in the calendar.
Create an asset that has both date-based and meter-based schedules.
The due date of the date-based schedule is 11/14/2014. The meter-based
schedule is 100 cycles with a current meter reading of 90. The Time
Per Day is set to 5 cycles.
The due date of the meter-based schedule would be 11/9/2014:
Estimated due date = Current date + (Next time due – Current Meter)/Time per day
Estimated due date = 11/7/2014 + (100 – 90)/5
Estimated due date = 11/7/2014 + 2
Estimated due date = 11/9/2014
The 2nd iteration would be on 11/29/2014:
Estimated due date = 1st due date iteration + (Next time due/Time per day)
Estimated due date = 11/9/2014 + (100/5)
Estimated due date = 11/9/2014 + 20 **to be used for the succeeding iterations
Estimated due date = 11/29/2014
If the schedule were date-based only, the 1st iteration is 11/14/2104
and succeeding iterations would be at intervals of 1 week.
With both schedules enabled, meter-based would be the priority because it is earlier.
Maintenance schedules can be planned using either a meter or a date or both. See Maintenance Due Dates for detailed information on the subject of entering maintenance schedules.
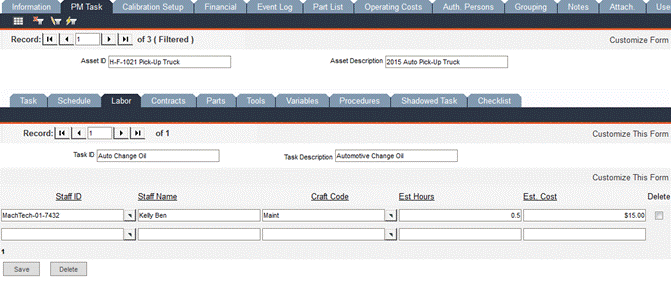
In this screen, use the Staff ID pop-up list to assign an employee to the task. The Staff Name and Craft Code fields will auto-fill with Staff Entry information. You can enter Estimated Hours for the employee as it relates to this task; Estimated Cost will auto-calculate based on the salary defined in the Staff Entry information. Click Save and a new blank row of fields will appear, allowing you to enter another labor record.
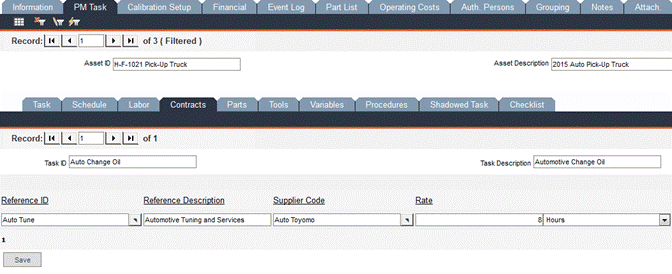
If a contractor provides services to complete this task, use the Reference ID pop-up list to select a contractor. All other fields will auto-fill with data entered from within Data Administration -> Contractors. Click Save and a new blank row of fields will appear, allowing you to enter another contractor record.
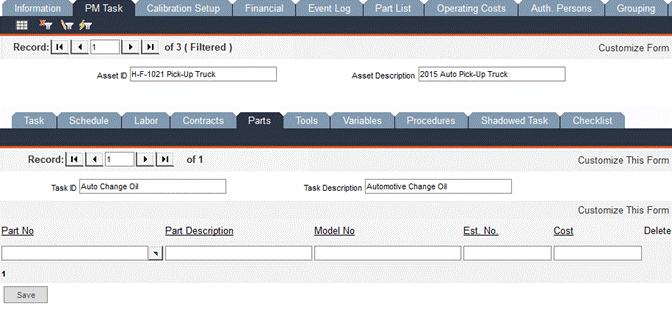
Use the Part No pop-up list to select a part to be used for this task. The Part Description and Model No fields will auto-fill from data entered from within Part Entry. Type the estimated number of parts needed for the task in the Est. No. field and press the tab key on your keyboard. The Part Cost field will be populated with the product of the Est. No. and the cost per unit that was entered within Part Entry. Click Save and a new blank row of fields will appear, allowing you to enter another part record.
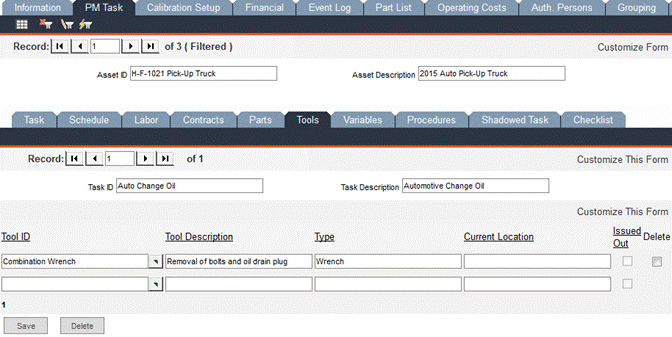
Use the Tool ID pop-up list to select a tool required for the preventative maintenance task; the remaining fields will auto-fill with data entered in Tool Entry. If the tool is currently issued out, the Issued Out checkbox will be automatically checked. These fields are not editable in this screen.
After selecting the Tool ID, click Save and a new blank row of fields will appear, allowing you to enter another part record.
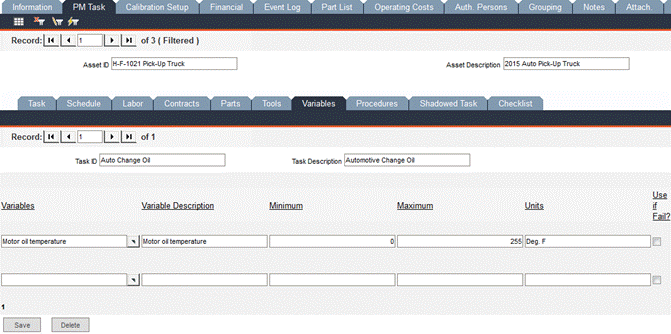
Use the Variables pop-up list to select a variable for the task; the remaining fields will auto-fill with data entered in Variable Data.
In Variable Data a checkbox is labeled as Allow Asset Use if It Does Not Meet the Criteria; the status of this checkbox does not affect the Use if Fail checkbox in the PM Task -> Variables sub-tab, though the two boxes mean the same thing. Here in the PM Task -> Variables sub-tab, the Use if Fail checkbox applies only to this variable as it relates to this specific asset.
After selecting the Variable from the pop-up list, click Save and a new blank row of fields will appear, allowing you to enter another variable record.
Use the Procedure Name pop-up list to select an appropriate procedure required for the PM task. After selecting the Procedure Name, click Save and a new blank row of fields will appear, allowing you to enter another procedure record.
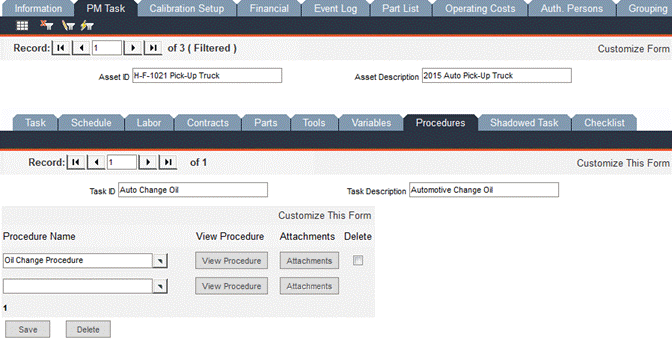
Click the View Procedure button to view the details of the procedure (as entered in Data Administration -> Procedures) in a separate window.
Click Attachments and the following window will open:

In this window, you can upload files to attach to the procedure; the attachment is loaded into the database. Please see Procedures – Attachments Tab for information about uploading attachments.
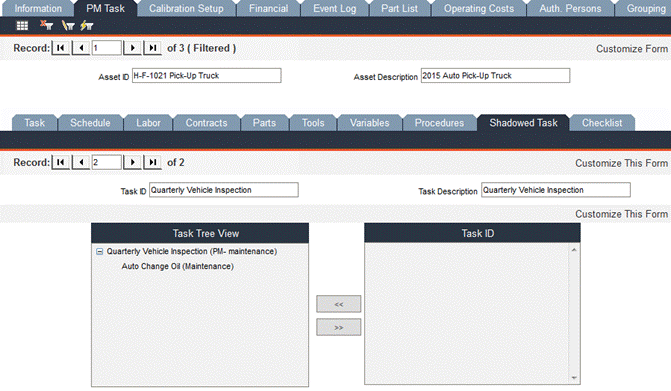
PM Task - Shadowed Task Sub-tab
A Shadowed Task is a task that is covered by or included in another task. When task shadowing is employed, the completion of the Shadowing Task automatically completes its Shadowed Tasks.
In the example below, there are two tasks associated with the asset. This record count is shown in the record indicator bar of the Shadowed Task tab.
We want the quarterly vehicle inspection task to be the Shadowing Task (shown in the Task Tree View). This means that it will include the oil change. In the Task ID pane, all of the other tasks associated with the current asset record will be displayed; in this case, the oil change. Click the oil change task to highlight it, then click the [<<] button to move it to the Task Tree View.
When the Shadowing Task is completed, it automatically updates the date done, meter done, date due and meter due of the Shadowed Tasks.
Within the Checklist sub-tab are two record indicator bars. The first one applies to the task; the second applies to checklists. Multiple checklists can be attached to a single task.
Use the Checklist Name pop-up list to select a checklist; data from the main checklist record (entered in Data Administration -> Checklists) will auto-fill the remainder of the form.
In the example below, we have only one checklist attached to the tire rotation task. Making changes to the checklist here does not affect the main checklist record nor does it affect the checklist anywhere else it is used. To make global changes to a checklist, it must be edited within Data Administration -> Checklists.
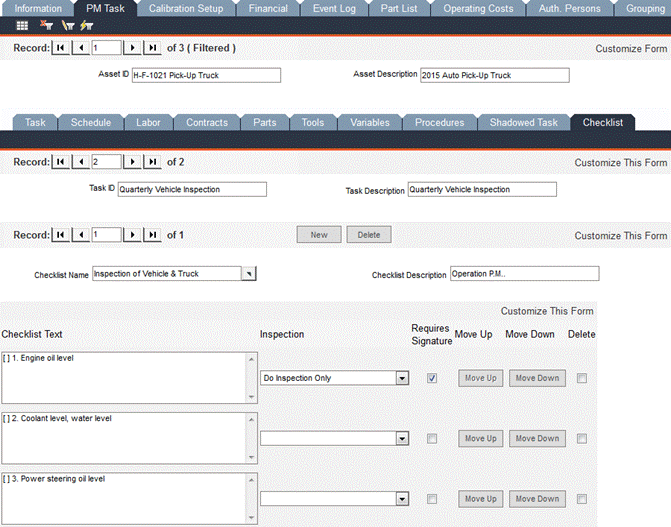
Inspection: Choose Do Item Only, Do Inspection Only or Do Item and Inspection from the drop-down list.
Requires Signature: Check this checkbox to require an electronic signature on this checklist item.
Move Up and Move Down buttons: Click on these buttons to move the checklist item up or down in the list to change the sort order.
Asset Entry - Calibration Setup Tab (8i Calibration Only)
In FaciliWorks 8i Calibration, the Calibration Setup tab is used to store calibration information for asset records. Calibration information for gage records is stored within Calibrations -> Calibration Entry.
The sub-tabs within the Calibration Setup tab mimic the main tabs in Gage Entry. Please see Gage Entry for detailed information.
This form functions in the same way as the Information tab for gage records. Please see Gage Entry for more information. Please note that the Usage button has the same functionality as the Issue/Return button.
Navigate to the Data Administration -> Assets -> Financial tab to maintain an asset’s financial information.
The Agreements pane captures information regarding contract terms, calendar and / or meter conditions and other information relevant to warranties, maintenance agreements and service agreements pertaining to the asset.
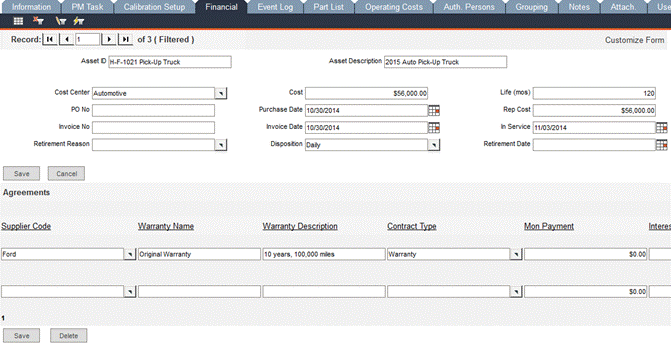
Cost Center: Use the pop-up list to select a specified cost center for financial reports grouping.
PO No: Enter the purchase order number used for the purchase of the asset.
Invoice No: Enter the number of the invoice received for the purchase of the asset.
Retirement Reason: Use the pop-up list to select a reason for the retirement of the asset.
Cost: Enter the original cost of the asset.
Purchase Date: Enter the date on which the asset was purchased.
Invoice Date: Enter the date on which you were invoiced for the asset.
Disposition: Indicate here when the asset is in use.
Life (mos): Enter the number of months of the asset’s useful life.
Rep Cost: Enter the replacement cost of the asset.
In Service: Enter the date the asset was put into service.
Retirement Date: Enter the date the asset is to be retired.
Enter terms and contract information and other information relevant to maintenance agreements or other contracts pertaining to the asset.
Supplier Code: Use the pop-up list to select a supplier.
Warranty Description: Enter the title of the warranty, maintenance agreement or service agreement.
Warranty Description: Enter a description of what the service agreement covers.
Contract Type: Use the pop-up list to select a contract type, i.e. Warranty.
Mon Payment: Enter the monthly payment amount specified in the agreement.
Interest Rate: Enter the interest rate specified in the agreement.
Invoice: Enter the invoice number for the service agreement.
Account No.: Enter the account number on the service agreement.
Agreement Term: Enter a numeric value in the first Agreement Term field and then use the drop-down list in the second Agreement Term field to select a unit of time (months or years).
Effective Date: Enter the date on which agreement goes into effect.
Current Meter: This field auto-fills with the current meter reading of the asset.
Agreement Cost: Enter the total cost of the agreement.
Expiration Date: Enter the expiration date specified in the agreement.
Notes: Enter any additional information pertinent to the agreement.
Expire: Click this button to automatically compute the expiration date of the agreement based on the Effective Date and Agreement Term.
Use this screen to enter information about events that involve an asset, such as a hail storm damaging a company vehicle or vandalism resulting in damage to a company building.
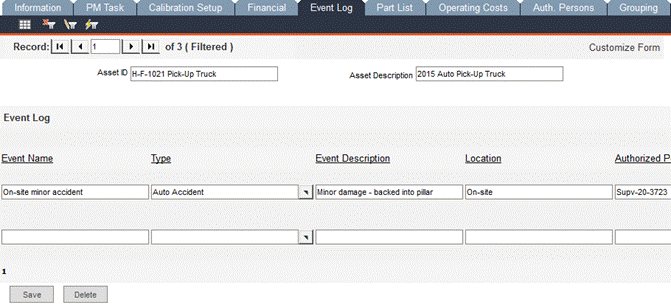
Every Event Name must be unique.
Use the Event Type pop-up list to select a type, such as Accident or Weather or enter a new type. If a new value is added, a prompt will appear to determine if the value should be added to the list.
Depending on the settings specified within the Configuration -> Admin Settings -> Advanced tab, this option might be inaccessible, meaning that Event Types can only be selected from the drop-down list.
Enter all other information that is pertinent to the event and click the Save button. A new blank row of fields will appear, allowing you to enter another event record.
Use this form to assign parts to an asset.

Use the Part No pop-up list to select a part; the remaining fields will auto-fill with information from the Part Entry record.
Click Save and a new row of fields will appear, allowing you to enter another part record.
Asset Entry - Operating Costs Tab
Use this form to capture asset operating costs. This form contains four sub-tabs to enter meter readings and other detailed information: Fuel sub-tab, Oil sub-tab, Tires sub-tab and Other sub-tab. Mileage entries cannot overlap and date entries must be consecutive.
Within each sub-tab are two sections:
A row of fields beginning with Mileage/Meter
A set of fields beginning with Capacity; the set of fields includes detailed information linked to the row data. Put your cursor in a row to activate that row; the lower portion of the form then displays the associated details.
In the Fuel sub-tab, use the bottom portion of the form to enter information about the asset’s fuel: the Cost per Unit, the Fuel Supplier and the Fuel Type. This portion of the form is reused for every entry to assist in the calculations displayed in the upper portion of the form; fields can be changed to be specific to each entry.
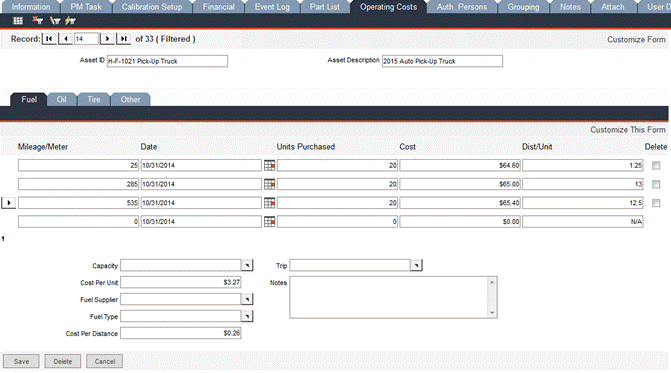
The upper section of the form tracks the history of the asset’s fuel usage. If the first fuel usage record is done at a mileage other than zero, the Dist/Unit in the first row will be inaccurate. After entering the second usage record, the Dist/Unit will be on track.
Between the first and second records, there is a mileage difference of 260. That difference is divided by the Units Purchased; the resulting amount is the Dist/Unit which is automatically calculated by FaciliWorks.
FaciliWorks multiplies the Cost per Unit by the Units Purchased and displays the product in the Cost field.
FaciliWorks also calculates the Cost per Distance field by dividing the most recent Cost field by the number of miles driven since the previous refueling. Between the second and third records, the number of miles driven was 250. The most recent Cost field (third record) is $65.40. 65.40 divided by 250 is 0.261 which is rounded to the nearest cent; FaciliWorks displays $0.26 in the Cost per Distance field.
The fields in the Fuel sub-tab are defined as follows:
Mileage/Meter: Mileage/meter reading when fuel is purchased.
Date: Date when fuel is purchased.
Units Purchased: Units of fuel purchased.
Cost: Cost of purchase.
Dist/Unit: Distance per unit.
Capacity: Enter the capacity of the fuel tank or quantity of fuel purchased or select a value from the pop-up list.
Cost per Unit: Enter cost per unit.
Fuel Supplier: Enter (or select from the drop-down list) the supplier of fuel.
Fuel Type: Enter (or select from the drop-down list) type of fluid.
Cost per Distance: Cost per unit-distance traveled by the asset during a particular fuel purchase or refill.
Trip: Enter the objective or type of trip/travel when fuel is purchased or refilled.
Notes: Enter any note or remark related to purchase of or fuel refill.
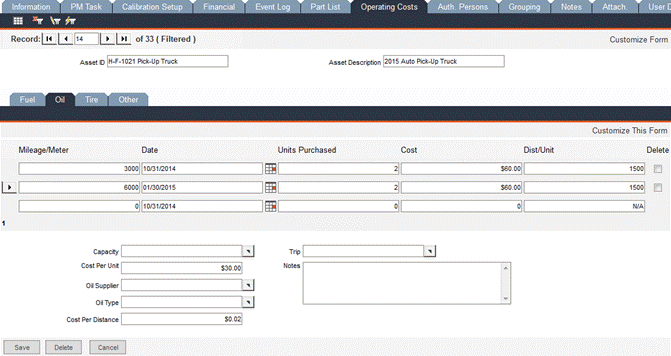
Navigate to the Oil sub-tab. For a vehicle’s first oil change, we’ll enter a Mileage of 3000, the date on which the oil was changed and the number of units of oil purchased. In the set of fields, we’ll enter $30.00 as the Cost per Unit and fill out the other fields as necessary. When the record is saved, FaciliWorks calculates the Cost field (multiplying Units Purchased by Cost per Unit).
When the vehicle has its second oil change, we’ll enter the data in the second row of fields and the set of fields below. This time, we’ll enter a Mileage of 6000, the date and the number of units purchased. In the set of fields, we’ll enter $30.00 as the Cost per Unit and fill out the other fields as necessary. When the record is saved, FaciliWorks calculates the Cost field (multiplying Units Purchased by Cost per Unit).
Now that there is a second record, FaciliWorks can calculate the Dist/Unit field.
Mileage/Meter: Mileage/meter reading when oil is purchased or changed.
Date: The date on which oil is purchased.
Units Purchased: The quantity of units of oil purchased.
Cost: Cost of purchase.
Dist/Unit: Distance per unit.
Capacity: Enter the capacity of the oil tank or quantity of oil purchased (or changed) or select a value from the pop-up list.
Cost per Unit: Enter the cost per unit.
Oil Supplier: Enter (or select from the pop-up list) the supplier of oil.
Oil Type: Enter (or select from the pop-up list) the type of oil.
Cost per Distance: Cost per unit-distance traveled by Asset during a particular oil purchase or change.
Trip: Enter the objective or type of trip/travel when oil is purchased or changed.
Notes: Enter any note or remark related to purchase of or oil change.
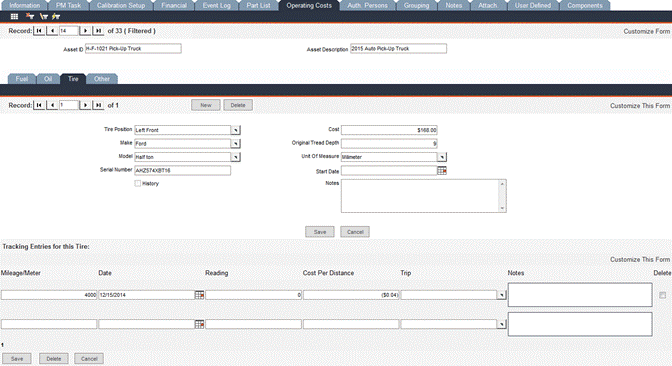
Click New to create a new tire record. In the upper portion of the form, enter the tire’s information. Click the Save button that is immediately below the upper section of the form to save this information.
In the lower section of the form are data rows. Use one row per reading. After entering a row of data, click the Save button at the bottom of the form and a new blank row of fields will appear, allowing you to enter the next reading. This section of the form tracks the history of the tire.
The fields in the Tires sub-tab are defined as follows:
Tire Position: Identify (enter or select from the pop-up list) the position of the tire.
Make: Identify (enter or select from the pop-up list) the make of the tire.
Model: Identify (enter or select from the pop-up list) the model of the tire.
Serial Number: Enter the serial number of the tire.
History: Check the checkbox to track tire history.
Cost: The purchase cost of the tire.
Original Tread Depth: Enter the tire’s original tread depth.
Unit of Measure: Enter the unit used in measuring the tread depth.
Start Date: Date on which this tire is first used.
Notes: Enter any note or remark related to measurement of tread depth.
Mileage/Meter: Current mileage/meter reading.
Date: Date on which the reading is taken.
Reading: The current tread depth of the tire.
Cost per Distance: Cost per unit-distance traveled during a particular measurement.
Trip: Enter the objective or type of trip/travel when measurement is taken.
Notes: Enter any note or remark related to measurement.
This sub-tab is used to track usage other than fuel, oil and tires, but functions in the same way as the Tire sub-tab. Please see Operating Costs - Tires Sub-tab for information about data entry.
Asset Entry - Authorized Persons Tab
To restrict the use of an asset to one or more staff members, navigate to the Assets -> Auth. Persons tab. At the top of the form are the Asset ID and Asset Description of the current record. Below that is the Restrict Issue drop-down list from which you can select Restricted, Not Restricted or Program Default. If nothing is selected here, the asset will not be restricted.
If Program Default is selected, FaciliWorks will behave according to whether or not the Restrict Issue to Authorized Users checkbox is checked within the Configuration -> Admin Settings -> Security tab. Please see the FaciliWorks Administrator Guide for more information about Admin Settings.
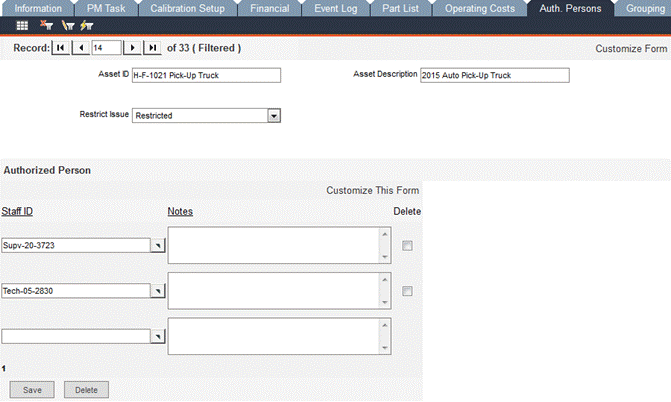
To restrict the use of the asset, select Restricted from the Restrict Issue drop-down list. In the Authorized Person pane, use the Staff ID pop-up list to select a staff member who is permitted to use the asset. Enter any applicable notes in the Notes field and click Save. Upon saving the record, a new blank row of fields will appear, allowing you to enter another staff member. The authorized staff members listed here will be the only staff members available for selection when issuing this asset (Assets -> Information -> Usage button).
When an asset is not restricted, the list of employees in the above example would include all active employees.
In a company with multiple locations, divisions or departments, asset grouping can be used to partition the shared database into multiple sections, one for each area. This allows each area to view only the assets (and the related PMs, work orders, and service requests) that pertain to that area.
Users can also be grouped by area; the user’s login credentials will determine which assets are accessible. Please see the FaciliWorks Administrator Guide for information about user groups.
To assign an asset to a group, the group must first be defined within Configuration -> Asset Grouping Entry. Please see the FaciliWorks Administrator Guide for detailed information about program configuration.
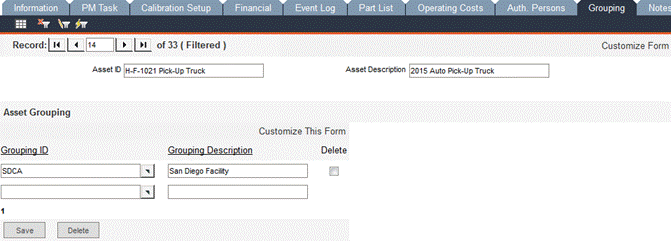
If the asset group was defined within the Asset Grouping module, use the Grouping ID pop-up list to select a group to which the asset will be assigned. The Grouping Description field will auto-fill with the description entered in the original group entry record.
Upon saving the record, a new blank row of fields will appear, allowing you to specify another group. Assets can belong to more than one asset group.
Any additions or deletions made here in this tab will also be reflected within Asset Grouping Entry and vice versa.
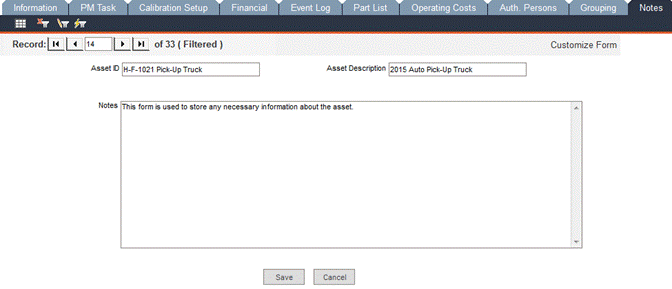
Use this form to store any other necessary information about the asset.
Use the Attachments tab to attach images or other documents to an asset record.

Click Browse… to locate and select the file you would like to attach and then click the Upload button. When the upload is complete, the File Description field will be auto-filled. Upon successful upload, a new blank field appears, allowing you to attach another file. Be sure to click Save after any modifications.
To view the file, click Preview and the attachment will open in a new window. An unlimited number of files can be attached to an asset. Each attachment will be stored in the database.
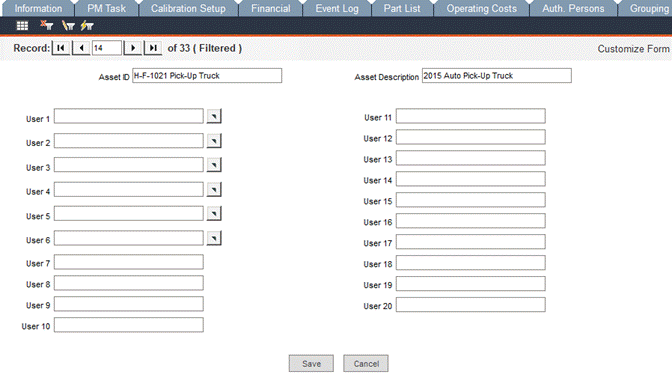
Asset Entry - User Defined Tab
This form gives users more flexibility as it provides 20 user-definable fields to use in your record keeping and reporting.
The field types (i.e., text field, date field or pop-up list) are edited within the Configuration -> Admin Settings -> Interface -> Asset Custom sub-tab. Please see the FaciliWorks Administrator Guide for detailed information about Admin Settings.
Click Customize Form to change the names of the fields. In the Label Text field, overwrite the default text (in this example, User 6) with a new, customized field name:

Scroll down to the bottom of the form and click Save; close the window. Refresh the User Defined tab by clicking the Save button and the new field name will be displayed:

This form gives a tree view of asset relationships. Components can be easily attached to each other by first locating the asset record for the parent component. The Asset Tree View pane on the left will display the parent asset. Select a child component from the Asset ID pane on the right and then click the [<<] button in the middle to create the link. The child asset will then be displayed beneath the parent asset.

Making this connection between assets will not only be shown here on the parent’s Component tab, but also in the Component tabs of the child assets:
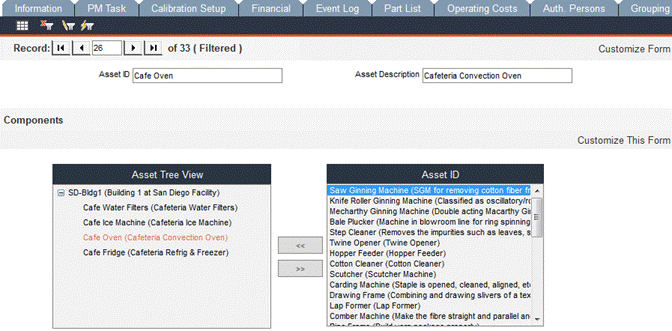
To break the relationship, select the child component on the left and then click the [>>] button.
You can have many layers of parent-child relationships. To specify a secondary child asset for a child asset already shown in the Asset Tree View, click the Asset ID (to highlight it), select a child asset from the list on the right and click [<<].
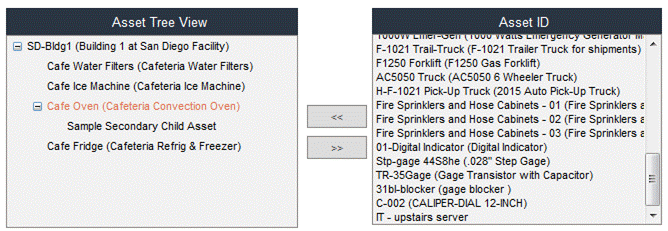
When components are linked as shown here, any computation involving a child component, such as meter readings, cost computation or due date, will have an effect on the total computation for the parent component. For example, a truck’s engine might be a child component of the truck. A part of the engine’s regular maintenance might be changing gaskets at regular intervals. The cost of changing the gaskets automatically adds the cost to the overall cost of maintaining the truck.
Gage Entry - Information Tab (8i Calibration Only)
In FaciliWorks 8i Calibration, the Assets module tracks both assets and gages. Navigate to the Data Administration -> Assets -> Information tab and use the record type selector icon to show all gages.
The type of record will be displayed in the upper left of the form: Gage Record.
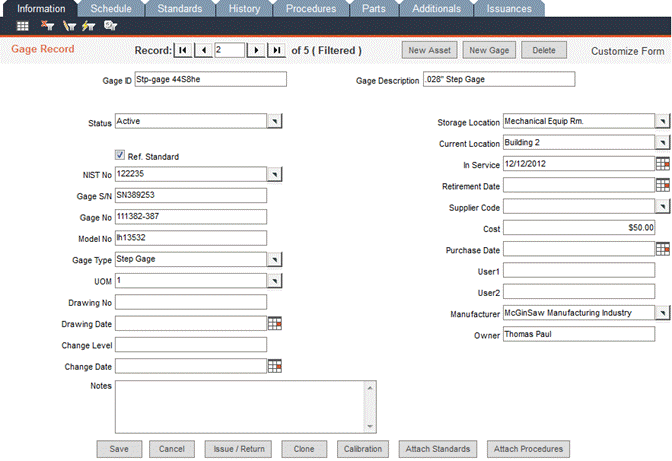
To add a new gage record, click New Gage.
Gage ID: Enter a unique alphanumeric identification code for each asset record. This ID must be unique in order to store the record in your database. This field is not equipped to accept special characters such as #, *, ?, !, ‘, or [ ] . If Automatic Numbering for Asset ID and Numbering Schemes is enabled and a Gage ID Numbering format is defined within the Configuration -> Admin Settings -> Automatic Numbering tab, clicking the New button will automatically populate the Gage ID field with the next sequential number. Please see the FaciliWorks Administrator Guide for information about numbering formats.
Gage Description: Enter a brief, informative description of the gage (if you use similar words for similar assets, you can later filter by this field).
Status: Use the pop-up list to assign a status to the gage. If a status is not specified, the gage will be marked as Active when the record is saved. If the Status is not Active, FaciliWorks will not schedule the next date due and the Calibration Due reports will skip over this gage, as they show only active gages.
Ref. Standard checkbox: Check this box to indicate that the gage is a calibration reference standard (such as a gage block or reference weight).
NIST No: For reference standards only, enter the number that NIST (National Institute of Standards and Technology) provides for traceability purposes. If it’s not marked on the reference standard, ask your supplier for the number.
Gage S/N: Enter the gage’s serial number.
Gage No: Enter the gage number (usually issued by your accounting department).
Model No: Enter the gage’s model number.
Gage Type: Enter the classification of the gage (i.e., Variable, Attribute, Dial, Vernier, Hard, Digital or SPC) or select it from the pop-up list. If you type a value in this field that is not already in the pop-up list, FaciliWorks will prompt you to add it to the pop-up list so you can select it for future gages. To add the value to the pop-up list, click OK in the ensuing window.
UOM (Unit of Measure): Enter (or select from the pop-up list) the actual units that the gage measures in (such as In, mm, N, LBf, LBm, Ohms or mA).
Drawing No and Drawing Date: If applicable, enter the gage drawing number and date of the original drawing (usually for custom-designed gages, fixtures or templates). Otherwise, use this field to store other information.
Change Level and Change Date: Enter the current change level ID of the current gage drawing and the date of the most recent drawing change level.
Notes: Use this field to store any comments about the gage.
Storage Location: Enter the gage’s storage or usual location (for example, Tool Crib–Bin 12).
Current Location: This field contains the gage’s current location (such as Assembly Dept.).
Service Date: Enter the date on which you first started using the gage.
Retirement Date: In this field, enter the expected or actual date on which you stop using the gage. Usually this date is at the end of the gage’s useful service life (typically 5-10 years) or at the expected date of major overhaul or maintenance.
Supplier Code: This field contains the supplier code or name of the gage supplier. If you plan to use supplier records, enter the Supplier ID code in this field, not the supplier name. The pop-up list for this field contains information that you entered in Supplier Entry.
Cost: Enter the actual purchase price or build cost of the gage.
Purchase Date: In this field, enter the date on which you purchased or first used the gage.
User1: This field stores any other data you need to track.
Manufacturer: Use the pop-up list to select the manufacturer of the gage or enter a new manufacturer and add it to the pop-up list.
Owner: Enter the owner of the gage.
Use the Issue/Return button on a gage record to issue a gage to an employee, to a different location or department, and to return the gage after use. This feature is particularly useful in a gage crib situation, where gages and inspection equipment are loaned out and then returned for storage and safe keeping. By tracking this information, you’ll know which gages your company uses most often and which employees or departments use them. This feature is used to issue and return a single gage at a time.
You must use Issue Tracking records for any gage whose calibration schedule is based on usage or cycles rather than elapsed calendar days. These records track usage days and operating cycles; they also update the next due date and/or estimated due date of gages with these frequencies.
Consistent use of the Part No field will create manufacturing traceability. For example, if you find that a gage is out of tolerance, you can immediately generate a part recall report that lists all parts that you might have incorrectly measured.
Click the Issue/Return button at the bottom of the form; the Issue tab is displayed. If this is the first issuance of the gage, use the initially displayed form; otherwise, click the New button to create a new issuance record.
The following fields will be automatically populated with information from the asset record: Gage ID, Description and Type. The Issue/Begin Date and Issue/Begin Time fields will auto-fill with the current system date and time.
Use the Issued/Used By EmpTo pop-up list to select the employee to whom the gage is being issued. If this gage is restricted to specified authorized users, only those users will be available in this list.
Use the Issued/Used Dept pop-up list to select the employee’s department.
Enter an Expected Return date.
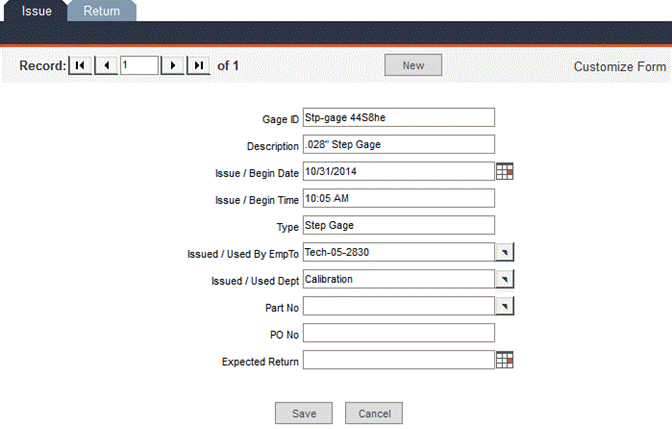
Click Save to save the issuance record and close the Issue/Return window. Notice that the Current Location field now shows the name of the employee to whom the asset was issued (along with department, if it was specified during the issuance).
When the employee returns the gage, click the Issue/Return button, then select the Return tab.
The Gage ID and Description fields will be automatically populated.
Received/End Date and Received/End Time can be manually entered or can be set to the current system date and time by clicking the grey rectangular button to the right of the calendar icon.
Use the Received/End From pop-up list to select the name of the employee who returned the gage (this is not necessarily the same person to whom it was issued).
Enter the number Cycles used during the issuance of the gage.
Enter any applicable Notes regarding the issuance or return of this asset.
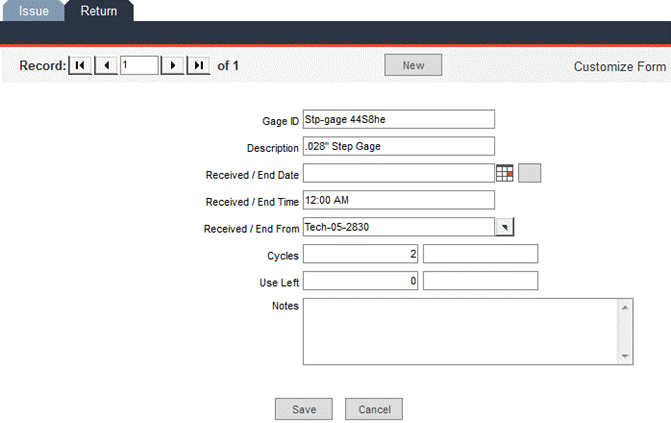
Click the Save button; the Issue/Return window will close and the gage record will now show that the gage is back in its storage location.
Notice in the issue and return example above that the record indicator bar shows that this is record 1 of 1 on both the Issue tab and the Return tab. If we create another issuance record for this gage, that issuance will be record 2 of 2. Clicking the Return tab for that second issuance automatically displays a new return record (record 2 of 2) corresponding to the most recent issuance.
Cloning a Gage with a Gage Type Numbering Scheme
To create a new gage record that is a copy of an existing record, including its set of calibration standards, procedures and parts, click the Clone button.
If the Gage Type of the source asset has a Numbering Scheme, then FaciliWorks will suggest the next number in the Numbering Scheme sequence by auto-filling the New Gage ID field. The Numbering Scheme is defined within the Configuration -> Admin Settings -> Automatic Numbering tab.
Cloning a gage record works just like cloning an asset record; please see Cloning an Asset Record with an Asset Type Numbering Scheme for instructions.
If the Gage Type of the source asset does not have a Numbering Scheme, then the application will suggest the next number in the Gage ID Numbering Format sequence defined within the Configuration -> Admin Settings -> Automatic Numbering; otherwise, that value must be entered manually if no Numbering Scheme exists.
Cloning a gage record works just like cloning an asset record; please see Cloning an Asset Record without an Asset Type Numbering Scheme for instructions.
In a new gage record, click the Calibration button and the following window will appear if there are currently no calibration records:
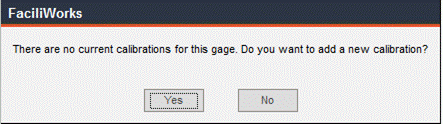
Click Yes; the Calibration Entry window will appear allowing you to enter calibration records. To return to gage record, click the Gage Entry button at the bottom of the calibration form.
If the gage you are viewing does have calibration records, going to Calibration Entry via the gage record will filter the calibration records to show only records that pertain to that particular gage. Please see Calibration Entry for detailed instructions regarding entering calibration records.
Attach Standards Button
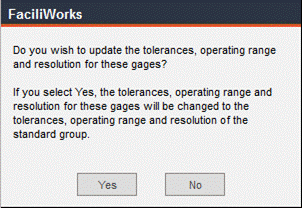
The Attach Standards button allows you to attach a standard to all gages within a specific gage type or classification. If there is an existing type or classification already assigned to the gage and you attach a new standard group to this gage record, it will replace any previously attached standards that have the same Standard ID as the new standard. For safety measures, FaciliWorks will ask for confirmation of this action.
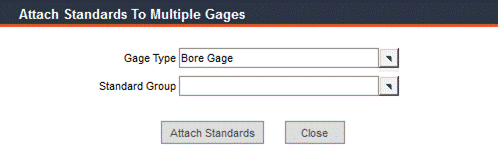
Select a Gage Type and a Standard Group Key and click Attach. The following verification message will appear:
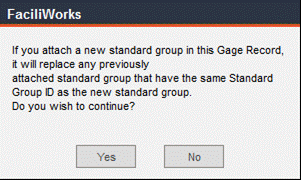
Click Yes; the following window will appear:
Click Yes; the following confirmation will appear:
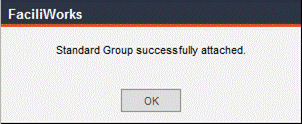
Click OK.
Attach Procedures Button
The Attach Procedures button allows you to attach a procedure to all gages within a specific gage type or classification. If there is an existing type or classification already assigned to the gage and you attach a new procedure to this gage record, each gage within the specified type will have the selected procedure attached to it. For safety measures, FaciliWorks will question whether you wish to continue with the new procedure attachment.
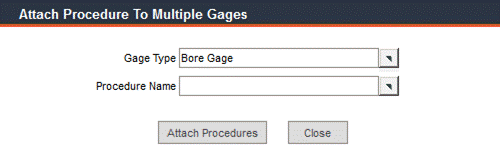
Select a Gage Type and Procedure and click Attach. The following verification message will appear:
Click Yes; the following confirmation message will appear:
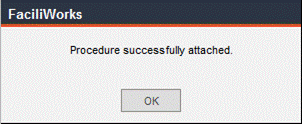
Click OK.
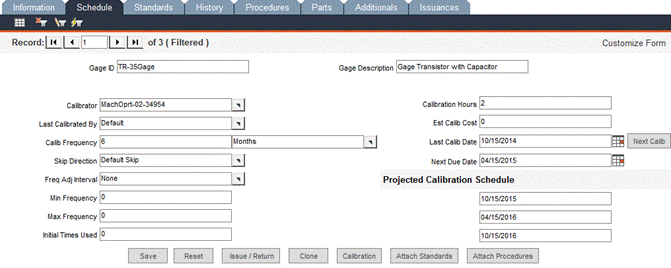
Use this form to enter the calibration schedule for a gage. The default version of this form is as follows:
If Usage or Cycles is selected for Calib Frequency, the schedule form changes slightly, as shown below, to accommodate Average Cycles/Usages Per Day and Estimated Due Date.
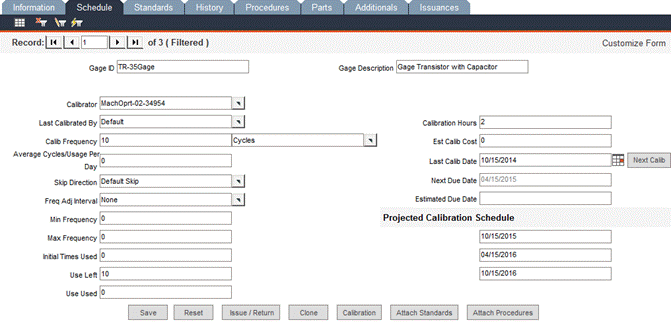
The fields in this form are defined below; the available fields depend on the frequency unit selected in the Calib Frequency field.
Gage ID: The ID of the selected gage will appear in this field.
Gage Description: The description of the selected gage will appear in this field.
Calibrator: Use the pop-up list to select the code for the supplier that normally calibrates the gage (the calibration service supplier). You can also set this field to In-House, a department name or technician’s name, if calibrated within your own facility (simply type the information into this field). Later, you can use this information to select a group of gages due for calibration by that calibrator.
Last Calibrated By: The name of the user who last calibrated the gage appears in this field.
Calib Frequency: Enter a numeric value in the left-hand field and use the pop-up list in the right-hand fields to select the unit of measure. FaciliWorks uses this frequency to calculate calibration due dates. For explanations of day, week, month, year, DOM and EOM frequency units, please see Maintenance Due Dates.
If Usage is selected in the Calib Frequency field, FaciliWorks will not calculate a due date for calibration; it will calculate an estimated due date based on the gage usage, even if you enter a calibration record for the gage. When you issue the gage, FaciliWorks calculates a predicted estimated due date based on the remaining number of usages days. You must use the Issue Tracking records in conjunction with this feature.
Selecting Cycles in the Calib Frequency field schedules calibration only when the total number of cycles equals or exceeds the frequency value. Cycles represent either the number of parts measured or number of cycles operated. You must use Issue Tracking records in conjunction with this feature.
If the frequency selected is Before Use, the gage must be calibrated before each use. FaciliWorks will not automatically calculate calibration due dates for this frequency; you must manually enter your due dates.
If the frequency selected is After Use, the gage must be calibrated after each use. FaciliWorks will not automatically calculate calibration due dates for this frequency—you must manually enter the due dates.
Average Cycles/Usage per Day: This field is used for Usage and Cycle gages only. Usage cannot be greater than one. It is used to calculate the estimated due date based on issuance and return.
Skip Direction: If the calibration date falls on a skip date, this determines whether to move the calibration date forward or backward to the first available working day.
Freq Adj Interval (Frequency Adjusting Interval): This feature will be available in a future phase of FaciliWorks.
Min Frequency: This is the minimum value that FaciliWorks can recommend for a calibration frequency interval. The default is 1, but you can change it according to the type of units you use.
Max Frequency: This is the maximum value that FaciliWorks can recommend for a calibration frequency interval. The default is 123, but you can change it according to the type of units you use.
Initial Times Used: Enter the number of times the gage was used before the record was entered into FaciliWorks.
Use Left: This field displays the amount of usage or cycles remaining before this gage is due for calibration. This field is only used if the gage has a Usage or Cycles calibration frequency and is not editable.
Use Used: This field displays the amount of usage or cycles that have been used since the last calibration of this gage. This field is only used if the gage has a Usage or Cycles calibration frequency and is not editable.
Calibration Hours: Enter the actual (or estimated) time it takes to calibrate the gage.
Est Calib Cost: Enter an estimate of the calibration cost, including labor and other necessary resources.
Last Calib Date: When you first enter the gage record, enter the gage’s last calibration date. Later, the program will automatically update this field whenever you add a new calibration record for the gage.
Next Due Date: This field shows the next calibration due date. It’s automatically updated whenever you add a new calibration record for the gage (Next Due Date = Last Calib Date + Calib Frequency). You can also manually enter any date into this field. If the current date is past the next due date, you'll see a Past Due message to the right of this date. To calculate this date immediately, click the Next Calib button (only if you’ve entered a calibration frequency and a last calibration date). Using this button, you can calculate the next due date even if you don’t enter a calibration record for the gage.
Estimated Due Date: This field is mainly for Usage and Cycles gages. Calculation of the estimated due date is based on the gage’s calibration frequency, the average cycles per day, issue/return and calibration history.
Projected Calibration Schedule: This is a list of the next three anticipated calibration dates, which FaciliWorks calculates when you click Next Calib. When you add a new calibration record for the gage, FaciliWorks automatically updates these dates, based on the current frequency.
Please see Gage Entry – Information Tab for an explanation of the buttons at the bottom of the form.
Gage Entry - Standards Tab (8i Calibration Only)
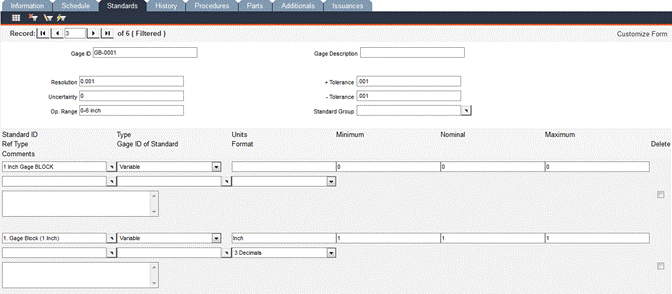
Use this tab to define the list of standards or test parameters that are measured when this gage is calibrated. Later, when you enter a calibration record for the gage, FaciliWorks automatically copies this list to the calibration record. It sorts and displays your calibration standards by Standard ID in ascending order. You can enter as many calibration standards as you need. After entering a record, click Save and a new blank row of fields will appear, allowing you to enter another record.
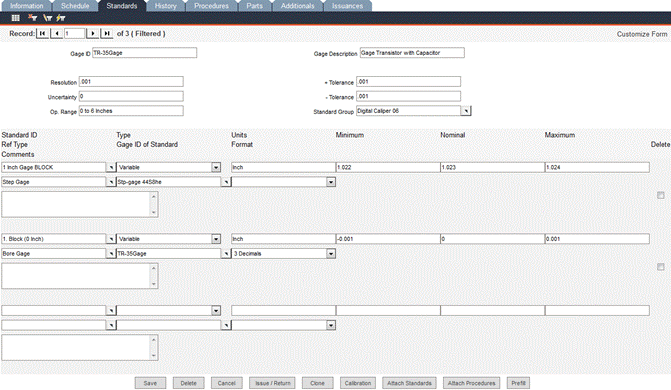
Resolution: Use this field to store the resolution of the gage. This is the smallest (or least count) unit of motion that the gage is capable of measuring and displaying. For example, 0.001 is the resolution on a typical dial caliper.
Uncertainty: This field contains the uncertainty value and is to be used only if this record is for a reference standard. You can obtain this value from the manufacturer. It’s expressed in units, such as percentage (0.5%), proportion (0.005), or measurement units (0.0001 inch).
Operating Range: Enter the gage’s allowable operating range as to the minimum and maximum size it could measure.
+ Tolerance: Use this field to store the upper (or plus) tolerance for the gage, as published by the manufacturer. FaciliWorks later uses this information to calculate the maximum value for calibration standards. To enter this value as a percentage of the nominal, enter the value followed by the percentage sign (for example, enter 1%). Check the placement of decimal points—for example, .01 equals one percent; .1 equals one-tenth of a percent.
- Tolerance: Enter the lower (or minus) tolerance for this gage, as published by the manufacturer (use a positive value). FaciliWorks later uses this information to calculate the minimum value for calibration standards. To enter this value as a percentage of the nominal, enter the value followed by the percentage sign (for example, enter 1%). Check the placement of decimal points—for example, .01 equals one percent; .1 equals one-tenth of a percent.
Standard Group: If the gage is associated with a standard group, select the group from this pop-up list. Using a Standard Group helps to update standards for a number of gages at once as well as fill in standards for common gages. The standard also includes resolution, precision, and plus/minus tolerance values. Please see Standard Group Tab for more information.
Standard ID: Enter the name or ID of the calibration standard or checkpoint (for example, Gage Block). Each Standard ID that you enter for the gage must be unique. If you need to use the same name for multiple standards, number or letter each name. For example, if you’re using CMM Check in more than one standard ID, number the name for each standard. Your IDs would appear as follows:
CMM Check
CMM Check
CMM Check
This numbering also permits you to control the list’s sort order (the program automatically sorts the list alphabetically by the Standard ID).
Type: Two types are available: Variable (V) or Attribute (A). Select V for those standards that have a value that you actually measure (such as 0.502 inches). Select A for pass/fail or visual types of checks. Selecting Attribute does not calculate accuracy of particular standard.
Units: Indicate the units being measured, such as inches, mm or degrees.
Minimum: When you enter the nominal measurement, FaciliWorks automatically calculates the minimum measurement, based on the gage’s minus tolerance. This value is the minimum acceptable value for the gage when you measure this standard (for example, 0.999).
Nominal: Enter the nominal value for the gage when you measure this standard (for example, 1.000).
Maximum: When you enter the nominal measurement, FaciliWorks automatically calculates the maximum measurement, based on the gage’s plus tolerance. This value is the maximum acceptable value for the gage when you measure this standard (such as 1.001).
Ref Type: Select the type of Reference Standard that will be used for this standard. The pop-up list will show the Gage Type of every reference standard in the database.
Gage ID of Standard: Select from a list of available Standard IDs. The list is limited by the Ref Type field. An empty Ref Type field would show all available IDs.
Format: Select numerical format for measurement appearance on reports. The format does not affect how measurements are shown in forms, only in reports.
Prefill Button: Use this function to save time when you have multiple calibration standards and their nominal values are evenly spaced (for example, if you have a group of standards with the values 1, 2, 3, 4, 5 and 6). Click the Prefill button and the following window will open:
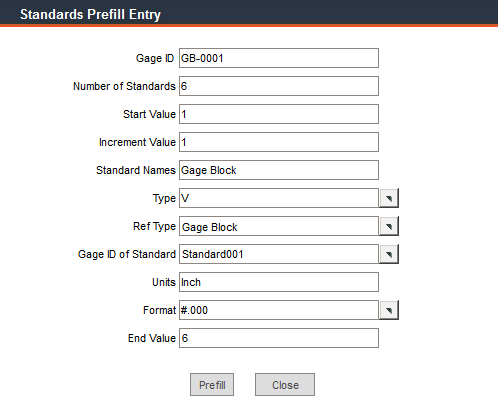
Gage ID: The ID of the selected gage will appear in this field.
Number of Standards: In this field, enter the number of standards you would like to prefill.
Start Value: Enter the smallest nominal value for the similar standards.
Increment Value: Enter the difference between the sizes of the nominal values of the standards, such as .5 or .005.
Standard Names: Enter the portion of the standard name that will remain static for all standards being prefilled. For example, enter 6 as your Number of Standards and 1 as the Start Value. Enter an Increment Value of 1 and Inch as the Unit (of measure). If you enter Gage Block as the Standard Names value, the resulting names for your standards will be:
1. Gage Block (1 Inch)
2. Gage Block (2 Inch)
3. Gage Block (3 Inch), etc.
If the number of standards is between one and nine, the Standard ID names will be numbered as shown above. However, for 10 to 99 standards, the numerical value preceding the name will be shown as two digits, i.e., 01. Gage Block (1 Inch).
Type: Select the type of standard: Variable (V) or Attribute (A). Select Variable for those standards that have a value that you actually measure (such as 0.502 inches). Select Attribute for pass/fail or visual types of checks.
Ref Type: Select the type of Reference Standard that will be used for this standard. The pop-up list will show the Gage Type of every reference standard in the database.
Gage ID of Standard: Select from a list of available Gage IDs of standards. The list is limited by the Ref Type field. An empty Ref Type field would show all available Gage IDs.
Units: In this field, enter the unit of measure that the standards share.
Standard Format: Select the numerical format that measurements will appear in on reports. The format does not affect how measurements are shown in forms, only in reports.
End Value: FaciliWorks calculates the end value for you, depending on the Number of Standards, the Start Value and the Increment Value.
Prefill Button: After you’ve entered the information, click the Prefill button. The following window will appear:
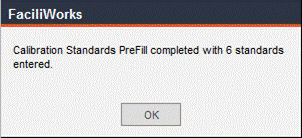
Click OK.
FaciliWorks will fill in the information. The Minimum and Maximum values will be calculated from the - Tolerance and + Tolerance values. Be sure to click Save before navigating away from this form.
Gage Entry - History Tab (8i Calibration Only)
The History tab displays a read-only calibration history for the selected Gage ID. These records are sorted by date in descending order and are not editable. FaciliWorks pulls this information from the data entered in Calibration Entry.
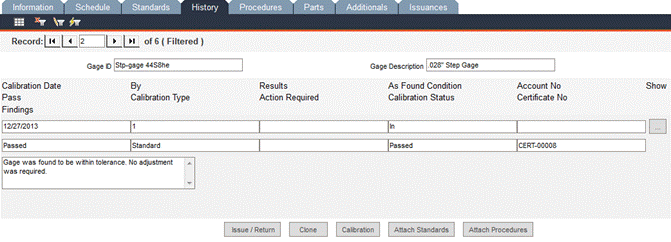
Calibration Date: This field shows the date for each calibration record.
By: In this field is the name of the user who performed the calibration.
Results: Any additional results recorded about the calibration will appear in this field.
As-found Condition: This field shows the condition of the gage before calibration or adjustment. This field will display In meaning in-tolerance, Out meaning out-of-tolerance or New meaning that this gage is a new instrument that has not yet been calibrated.
Account No: This field displays an account number or other tracking number associated with the cost (examples include a job, purchase order, invoice or customer number).
Click the […] button to the right of a record to view the associated calibration record.
Pass: This field displays the pass/fail status of the calibration.
Calibration Type: A description of the type of calibration performed will appear in this field.
Action Required: Any action that may be required, such as Send out for Repair.
Calibration Status: This field displays the final calibration status: Passed, Failed, Repaired or Limited.
Certificate No: The certificate number issued by the outside calibration provider or your company.
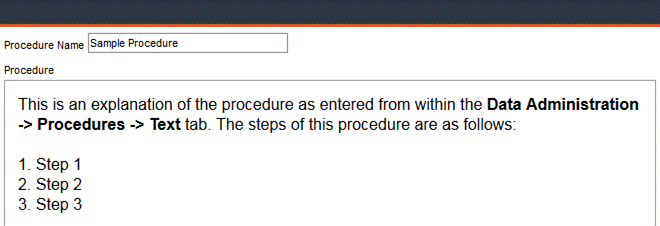
Use this form to attach procedures to a gage record. Use the Procedure Name pop-up list to select a procedure. These procedure records are entered within the Data Administration -> Procedures -> Text tab.
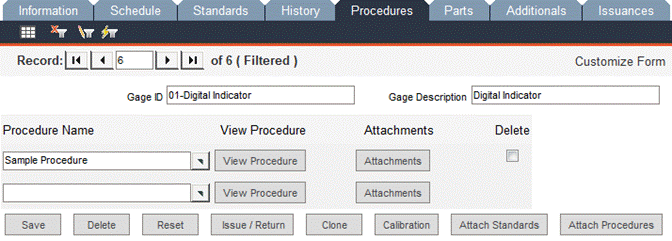
To view the text of a procedure in its entirety, click View Procedure; the text will display in a separate window or under a new browser tab. When you’re finished viewing the procedure, close the window.
Click the Attachments button and the following window will open, displaying the procedure’s attachments (if any were attached from within the Procedures -> Attachments tab) and allowing you to upload additional attachments specific to this gage:
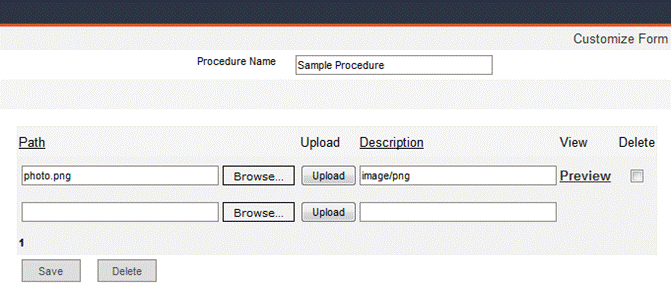
Click the Browse button to locate a file and then click Upload. The Description will be automatically populated with the type of attachment. Upon successful upload, a new blank field will appear, allowing you to attach another file. When finished, click Save and close the window.
To delete the attachment, check the Delete checkbox of the record and then click the Delete button.
Use these records to define the parts and operations used by the gage. By linking this information to each gage, you’re facilitating manufacturing traceability. Before you can link a part to a gage, you must enter the part’s record in Part Entry.
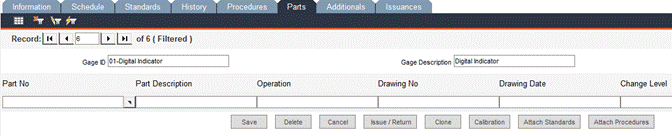
Part No: Select the part from the pop-up list; this action auto-fills the other fields with the information that was entered in Part Entry. Part information on this form is read only.
Part Description: The name of the part will appear in this field.
Operation: This field stores the production operation or work center description, such as “Stamping” or “Machine 13.”
Drawing No: The blueprint drawing number of the part appears in this field.
Drawing Date: The date of the original drawing.
Change Level: The current change level ID of the current gage drawing.
Change Date: The date of the most recent drawing change level.
This screen is for entering any user-defined data that is not included in any of the predefined fields in the other screens of Gage Entry. The fields can be customized to be text, date or list fields from within the Configuration -> Admin Settings -> Interface -> Asset Custom sub-tab. Please see the Administrator Guide for instructions.
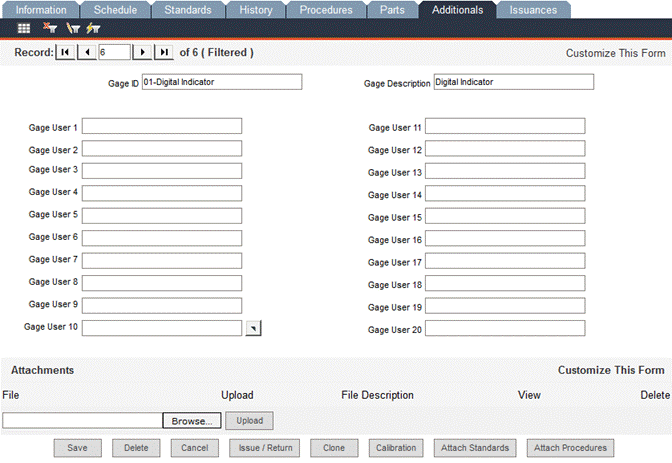
To solely customize the field names, you can click the Customize This Form link in the upper right corner of the form and overwrite the contents of the Label Text field:

Use the Attachments pane of the Additionals tab to attach documents or images to a gage record. Click the Browse button to locate and select the file you would like to attach. Then, click the Upload button. When the upload is complete, the File Description field will be auto-filled. Upon successful upload, a new File field appears, allowing you to add another attachment. To view an attachment, click Preview.
To delete an attachment, check the Delete checkbox of the attachment and then click the Delete button.
The upper section of this form is used to restrict the issue of a gage to authorized personnel. Restricting the issuance of a gage requires that at least one authorized person be specified. Use the Staff ID pop-up list to select an authorized staff member. Use the Notes field to enter any information about the person’s use of the gage.
The Restrict Issue drop-down list has three options:
If Program Default is selected, the application will check the status of the Restrict Issue to Authorized User checkbox within the Admin Settings - Security tab. If that box is checked, the issuance of the gage will be restricted. If that box is not checked, the issuance of the gage will be unrestricted.
Selecting Restricted overrides the program default and the issuance of the gage will be restricted to the authorized persons.
Selecting Not Restricted overrides the program default and the issuance of the gage will be unrestricted.
When issuing a gage (in the Issue/Return form), the Issued / Used By EmpTo field contains a pop-up list. If a gage is restricted, only authorized users appear in this list. If the gage is unrestricted, all active staff members will be in the list.
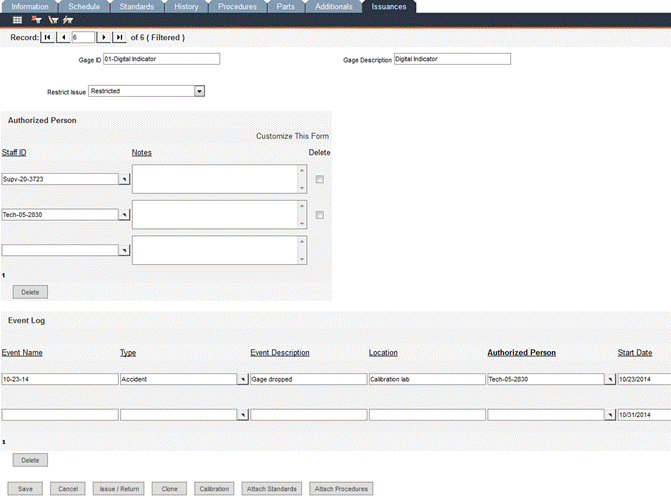
The bottom portion of this form is the Event Log. Use this area to enter information about events that involve the gage.
Every Event Name must be unique.
Use the Event Type pop-up list to select a type, such as Accident or enter a new type. If a new value is entered, a prompt will appear to determine if the value should be added to the list. Depending on the settings specified within the Configuration -> Admin Settings -> Advanced tab, this option might be inaccessible, meaning that Event Types can only be selected from the drop-down list.
Enter all other information that is pertinent to the event and click the Save button. A new blank row of fields will appear, allowing you to enter another event record.